To convert HEIC to JPG on a Mac, select the photos in the Finder, Control-click them, choose Quick Actions, then Convert Image, and set the format to JPEG: macOS writes a JPG copy next to each original. Preview, the Photos app and the sips command in Terminal also convert HEIC to JPG for free, and sips is the only built-in method that converts a whole folder with its subfolders in one go. Every step in this guide was tested on macOS 26.5 on 2026-11-11.
HEIC (High Efficiency Image Container) is the format the iPhone uses for photos by default. It keeps the same visible quality as JPG in about half the space, but websites, older Windows apps, some content management systems and many client inboxes still expect JPG. The four methods below cover a single photo, a selection and a full folder; the last section covers teams that convert batches every week. If the photos are still on the phone, how to send photos from iPhone to computer explains which transfer methods already convert to JPEG on the way.
Which method should you use to convert HEIC to JPG on a Mac?
The Finder's Convert Image is the right method for most people, Preview is best when you want to set the quality by eye, Photos is best for pictures already in your library, and Terminal is the only one that handles subfolders. All four ship with macOS, so nothing needs to be installed.
| Method | Best for | Subfolders | Quality control | Where the JPG lands |
|---|---|---|---|---|
| Finder, Quick Actions, Convert Image | One photo or a selection | No | Size only | Next to the original, .jpeg |
| Preview, File, Export | One photo, quality by eye | No | Slider with file-size preview | The folder you choose |
| Preview, Export Selected Images | A set opened together | No | Format options | The folder you choose |
| Photos, File, Export, Export Photos | Pictures in your library | No | Four JPEG quality levels and size | The folder you choose |
Terminal, sips in a loop |
A whole folder tree | Yes | 0 to 100 | A mirror folder you name |
Tested on macOS 26.5 on 2026-11-11 with iPhone HEIC files. Menu names follow the English system language.
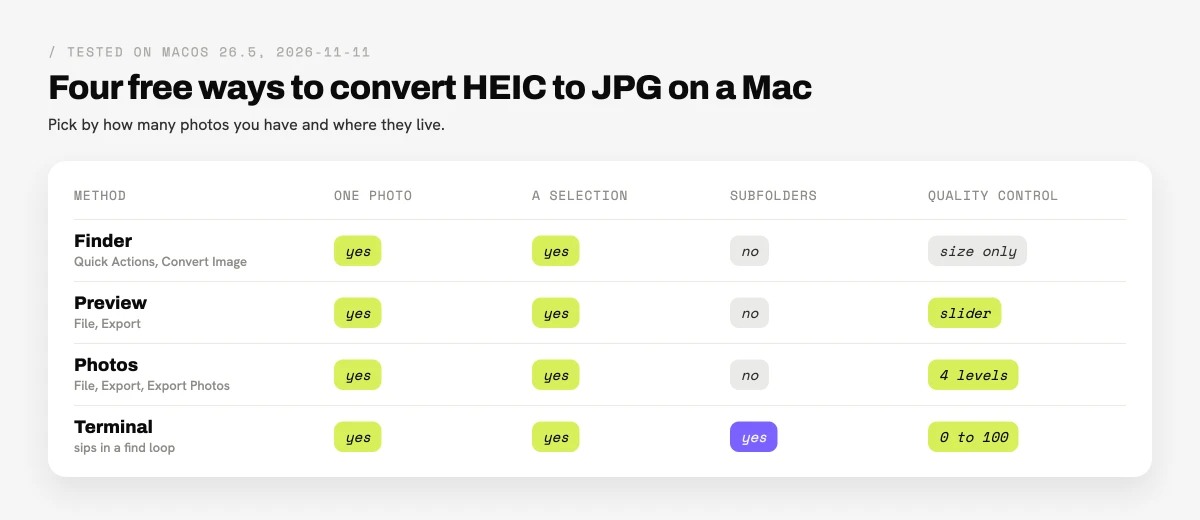
How do you convert HEIC to JPG with the Finder?
The Finder converts HEIC to JPG with a Quick Action, without opening any app, and it works on one photo or on as many as you select. Apple documents Quick Actions in its guide to performing quick actions in the Finder.
- Open the folder in the Finder and select the HEIC photos (Command-A selects everything in the window).
- Control-click one of the selected files and choose Quick Actions, then Convert Image.
- Set Format to JPEG. Leave Image Size on Actual Size to keep every pixel, or choose a smaller size for web use.
- Keep Preserve Metadata ticked if you want the date and location to travel with the photo; untick it before sending pictures of a private place.
- Click Convert to JPEG.
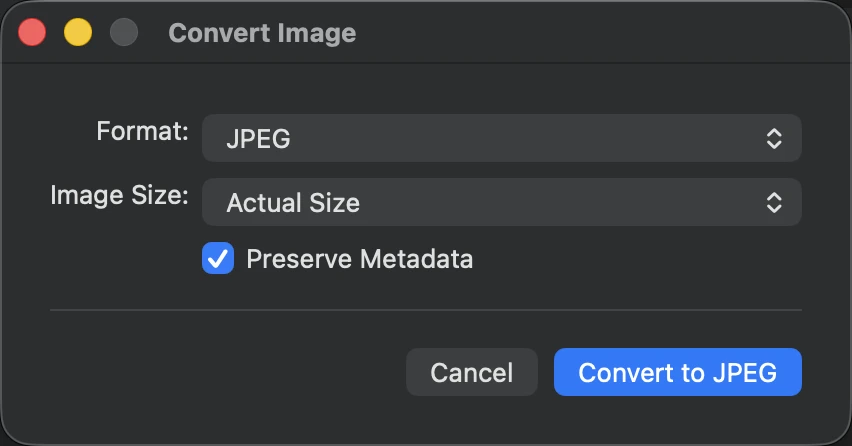
In the test, four selected files produced four .jpeg copies in the same folder with the same names (IMG_0413.HEIC became IMG_0413.jpeg), and the originals stayed where they were. Convert Image does not look inside subfolders: if the photos are spread across several folders, select them from a Finder search for "HEIC" or use the Terminal method.
How do you convert one HEIC photo to JPG in Preview?
Preview converts a HEIC photo to JPG through its Export command, and it is the method to use when the file size matters, because it shows the size before you save.
- Double-click the HEIC photo to open it in Preview.
- Choose File, then Export….
- Set Format to JPEG.
- Move the Quality slider between Least and Best and watch File Size change underneath.
- Choose where to save it and click Save.
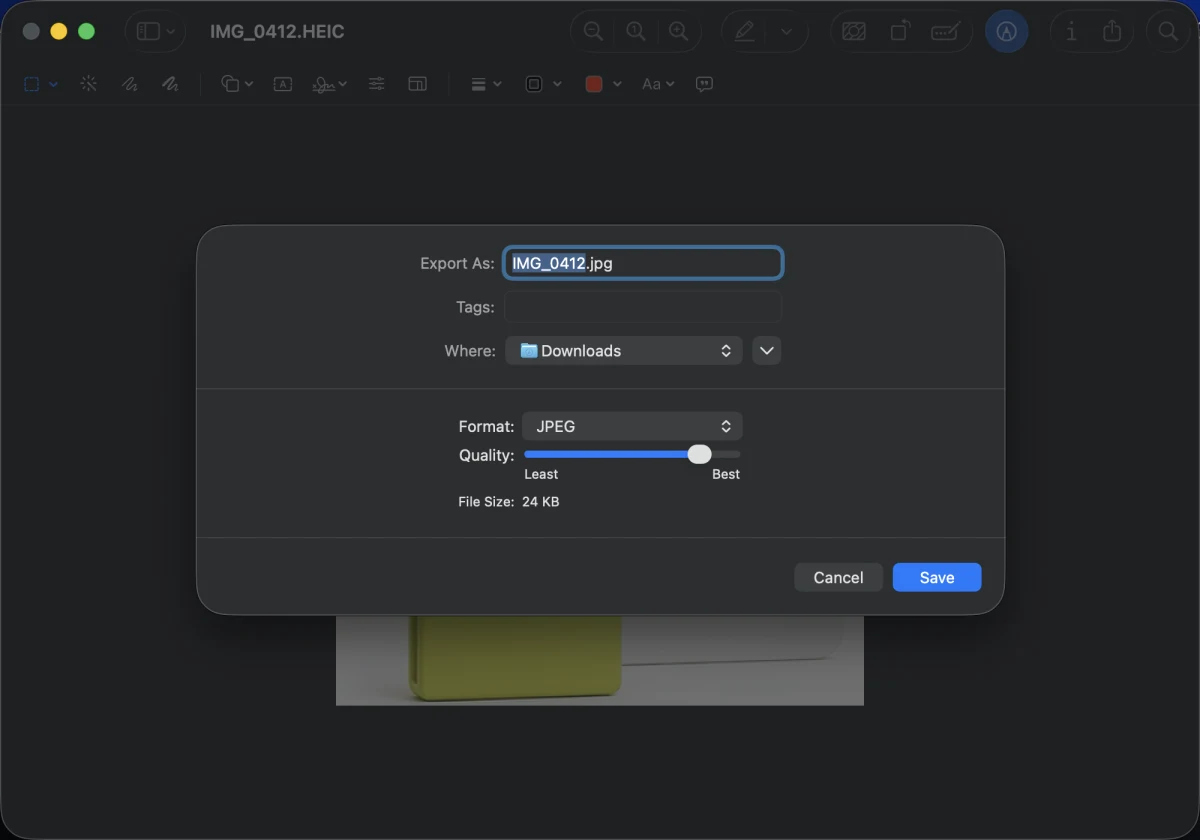
For several photos at once, select them all in the Finder and open them together in Preview, press Command-A in Preview's sidebar to select every image, then choose File, then Export Selected Images…, pick a destination folder and choose JPEG as the format in the export options.
How do you convert HEIC photos from the Photos app?
The Photos app exports pictures from your library as JPG with File, then Export, then Export Photos, and it is the only built-in method with named quality levels. Apple's guide to exporting photos on Mac lists every option.
- Select the photos in Photos.
- Choose File, then Export, then Export Photos… (the menu shows the number of photos selected).
- Set Photo Kind to JPEG.
- Choose a JPEG Quality and a Size; Full Size keeps the original resolution.
- Click Export and pick a folder.
Two traps. Export Unmodified Original, in the same menu, exports the HEIC file as it came from the iPhone, so it does not convert anything. And dragging photos from Photos to a Finder folder, which Apple calls the easiest way to export, uses the default settings instead of the ones you pick in the Export dialog.
How do you convert a whole folder of HEIC files to JPG?
A whole folder of HEIC files, subfolders included, converts in one step with sips, the image tool built into macOS, run inside a find loop in Terminal. None of the other built-in methods reads subfolders.
- Open Terminal (Applications, then Utilities).
- Type
cd, with a space, drag the folder of photos onto the Terminal window and press Return. - Paste the command below and press Return.
find . -type f -iname '*.heic' -print0 | while IFS= read -r -d '' f; do
  out="../$(basename "$PWD")-JPG/${f%.*}.jpg"
  mkdir -p "$(dirname "$out")"
  sips -s format jpeg -s formatOptions 90 "$f" --out "$out" > /dev/null
done
The command finds every file ending in .heic or .HEIC in the folder and every subfolder, creates a new folder next to it with -JPG added to its name, rebuilds the same subfolders inside, and writes one JPG per photo. Names with spaces work, and the originals are never changed. formatOptions 90 is the JPG quality on a 0 to 100 scale; 90 is a good default for photos you send to a client, and 80 is enough for a website. The sips reference lists the other options, such as -Z 2048 to cap the longest side at 2,048 pixels.
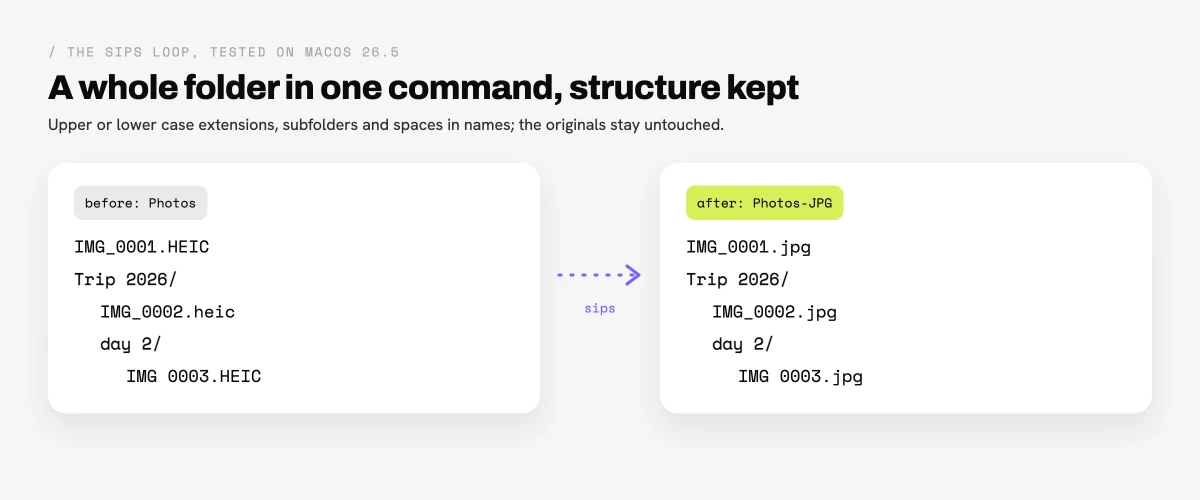
The test folder had .HEIC and .heic files, a subfolder named Trip 2026 and a second level named day 2; the command ran the same in zsh, the default Mac shell, and in bash. The one-line versions found in forums, such as sips -s format jpeg *.HEIC --out ., miss lowercase extensions and subfolders.
Does converting HEIC to JPG lose quality or metadata?
Converting HEIC to JPG loses a little quality, because JPG compresses less efficiently, and the file usually gets larger rather than smaller. In the test, a 2.4 MB photo taken on an iPhone 16 became a 3.9 MB JPG at quality 90, about 60% larger, with no visible difference on screen. At quality 80 the JPG is closer to the HEIC in size.
Metadata survives if you let it. The sips conversion kept the date taken, the camera model and the GPS location of that iPhone photo. In the Finder the Preserve Metadata box controls it, and in Photos the export options set what is included. Strip the location before sending photos of a home, a client's office or anywhere private.
Renaming a .heic file to .jpg does not convert it. The data inside stays HEIC, so the apps that could not open it still cannot. The same methods convert HEIC to PNG: choose PNG in Convert Image, Preview or Photos, or use -s format png and .png in the sips command. PNG files are several times larger than JPG, so keep PNG for graphics and screenshots rather than photos.
How do you stop your iPhone from saving photos as HEIC?
The iPhone saves photos as JPEG instead of HEIC when you open Settings, tap Camera, tap Formats and choose Most Compatible, as Apple explains in its page on using HEIF and HEVC media on Apple devices. New photos and videos then use JPEG and H.264, and they take more space on the phone; photos already taken stay in HEIC.
Most people do not need to change it. When photos move to a computer by cable, the iPhone already converts them to JPEG unless Keep Originals is set in Settings, Apps, Photos. The iPhone to computer guide compares which transfer methods keep HEIC and which convert.
How can a team convert HEIC photos in batches every week?
A team that converts batches every week can stay with the free methods: they work, and the sips loop handles any folder size. What they do not do is share the result. The JPGs sit on one person's Mac, and the next step is usually a second app to send them to a client or a colleague.
Brault, a creative file management platform, puts the conversion and the delivery in the same place. Brault Desktop for Mac converts images, HEIC included, to JPG, PNG, WebP, AVIF, TIFF, GIF or PDF in batches of up to 100 files: drop the files on the menu bar icon or on the panel and choose Convert. The JPGs are saved to Downloads, and from the same panel you can send them with a Brault Transfer link or add them to the team's Brault library. A dropped folder adds the files at its top level, not those in its subfolders, so the sips loop above is still the tool for a deep folder tree. When every image in the batch comes from a folder on the Mac, is at most 80 megapixels and 200 MB, and the output is JPG, PNG, TIFF, GIF or PDF, the conversion runs on the Mac itself and does not count against the daily quota; otherwise it runs on Brault's servers. Files already in a Brault library convert from Download as… in the web file viewer.
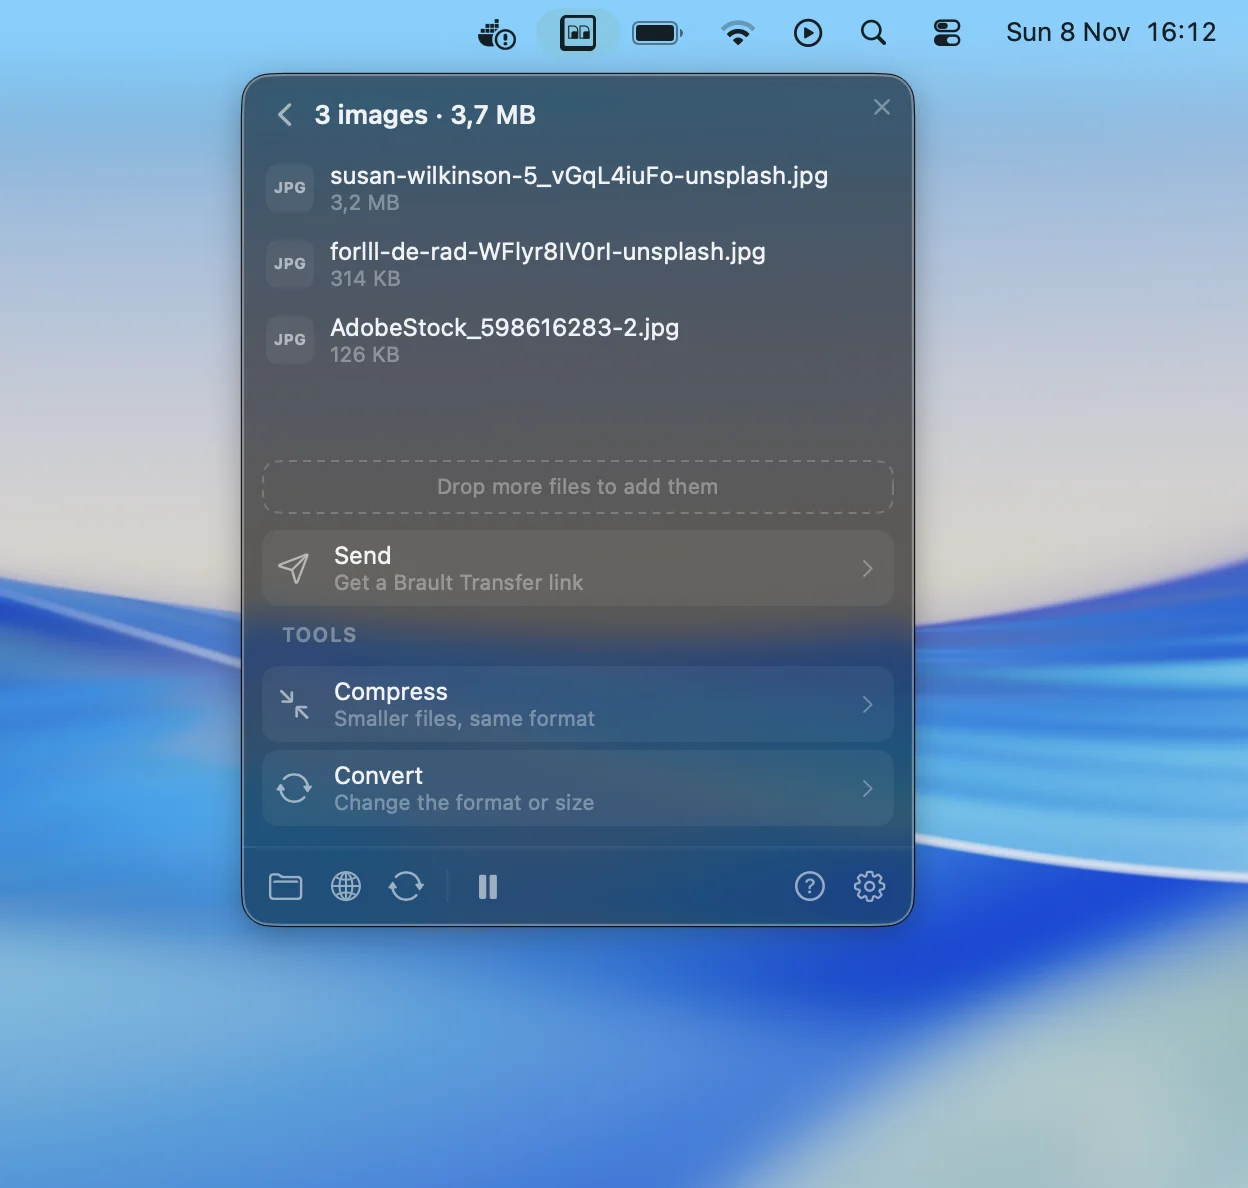
Convert and compress are included in Pro at $12 a month billed annually for individuals (2 TB, 100 conversions a day) and Growth at $70 for teams (5 TB, 4 users included, $4 per extra user, 500 conversions a day); they are not part of the Free plan. Details are on the convert and compress page and plans on the pricing page. For sending the results, how to send large files via email covers the size limits of each mail provider, and how to compress a video for email does the same job for clips. For documents, how to compress a PDF on Mac compares Preview, Ghostscript and Brault Desktop on a measured file, and for iPhone and camera clips, how to convert MOV to MP4 on Mac tests QuickTime, the Finder, avconvert and ffmpeg.
Frequently asked questions
How do I convert HEIC to JPG on a Mac?
Select the HEIC photos in the Finder, Control-click, choose Quick Actions, then Convert Image, set Format to JPEG and click Convert to JPEG. macOS writes a .jpeg copy next to each original with the same name. Preview (File, Export), Photos (File, Export, Export Photos) and the sips command in Terminal also convert HEIC to JPG without installing anything, tested on macOS 26.5.
How do I convert a whole folder of HEIC files to JPG on a Mac?
Use the sips command inside a find loop in Terminal. It finds every .heic and .HEIC file in the folder and its subfolders, handles spaces in names, and writes the JPGs into a separate folder with the same structure, leaving the originals untouched. Finder Quick Actions and Preview only convert the files you select, not the files inside subfolders.
Does converting HEIC to JPG lose quality?
Some, because JPG compresses with an older, less efficient method, but at quality 90 the loss is not visible on screen and the file gets larger, not smaller. In a test on macOS 26.5, a 2.4 MB iPhone 16 HEIC became a 3.9 MB JPG at quality 90, about 60% larger, with the date, camera model and GPS location kept.
Can I just rename a .heic file to .jpg?
No. Renaming the extension does not change the data inside the file, so apps that cannot read HEIC still fail to open it, and some show an error because the content does not match the name. Convert it with Finder, Preview, Photos or sips instead.
How do I stop my iPhone from saving photos as HEIC?
Open Settings, tap Camera, tap Formats, then tap Most Compatible. New photos are then saved as JPEG and videos as H.264, as Apple documents in its HEIF and HEVC support page. Photos already taken stay in HEIC, and the files are larger than with the default High Efficiency setting.
Key takeaways
- The quickest way to convert HEIC to JPG on a Mac is the Finder: select, Control-click, Quick Actions, Convert Image, JPEG. The JPG lands next to the original.
- Preview shows the JPG file size before saving, and Photos exports from the library with four quality levels; neither reads subfolders.
- For a folder with subfolders, the tested
sipsloop converts every.heicand.HEICfile into a mirror folder and never touches the originals. - A JPG at quality 90 is about 60% larger than the HEIC and keeps the date, camera and location unless you strip them.
- Teams that convert and send every week can do both from Brault Desktop for Mac, in batches of up to 100 files, on Pro or Growth.
Want to convert a batch and send it from the menu bar? Try Brault free.